
Have you ever wondered what are the shortcuts you could use to display layered transform properties?
You’ll find in today’s post the solution and much more.
Jeff Sengstack, our Adobe certified instructor, will talk about:
- the 5 transform properties and their shortcuts
- the shortcuts you should use when working with multiple properties
- the shortcuts you should use when working in multiple layers at the same time
Note: As usually, there’s a video tutorial you can watch to make sure you’ve understood Jeff’s tips & tricks.
So let’s start learning about keyboard shortcuts you can use to display layered transform properties.
I have two image files as assets.
I’m going to create a new comp by clicking on the “New Comp” icon.

I’ll use a standard comp preset of HDTV.
And we’ll set it to ten seconds and we’ll click “Ok.”
I’m going to add one of the image files to it.
The first image file here is very tall. It’s taller than the comp.
I’m going to drag it down.
And I need to change the size of this so then it fits inside the comp.
You can access the Context Menu by right-clicking on the image.
But you can also right-click on the layer as well.
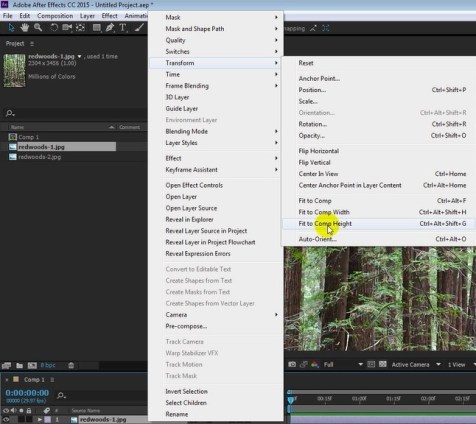
And then go to “Transform” and fit the comp height because it’s a vertical format image.
All right, I’ll add the second one. This is a horizontal or landscape format image.
I’ll drag it down. And it’s going to be much too wide.
I’ll right-click on it here and so the comp panel and go transform, and hit the comp width.

After Effects Academy Member Extra
Access your ‘After Effects Shortcuts ’ Course in the After Effects Academy.
Jeff Sengstack will introduce some of the most popular shortcuts in After Effects
Click here to access this After Effects Shortcuts Course now
Not an AE Academy member? Click here to learn more about the After Effects Academy
Here’s the tutorial video:
So you have two images there.
One of them is covering up part of the one below it.
If I turn that off for the moment you’ll see that the one below it has my daughter inside this redwood tree which is just on the road from at the Armstrong Redwood State Park.
Let’s take a look at this top one here. I’ll turn that back on, turn off the bottom layer.
Every layer except audio layers has transform properties.
To see them you just make the layer active and open up the disclosure triangle and there’s the transform property group, and open it up.

There are five transform properties.
– anchor point
– position
– scale
– rotation
– opacity.
You can access these one at a time instead of having to go through this process of opening up “Transform” and seeing all five of them. And it’s usually more convenient to access them based upon their name rather than see all five of them at once when all you want to do is just work on the scale, for example.
So I’m going to show you the five keyboard shortcuts. They’re all inside the pdf that I provided with the course.
These five shortcuts are really intuitive.
A – anchor point
P – position
S – scale
R – rotation
T – opacity.
The only one that’s not immediately intuitive is Opacity. But if you think of Opacity to be as opaci-T, then you can see that the keyboard shortcut “T” works out just fine for opacity.
All right, back here in After Effects, to make this work, I need the timeline active.
So I click on that and see the blue border around it.

So now that this is active, when I press the “S” key, for example, scale shows up.

And I could adjust the scale.
If you want to switch to position, press the “P” key. That replaces scale with position.
You drag it left to right, up and down.
If I want to shift to rotation, I press the “R” key that replaces position with rotation. You rotate it like so.
If I want to change the opacity I press the “T” key. That’s opacity, we can reduce the opacity like that.
And finally, to get to the anchor point, that’s letter “A.” And changing the anchor point is not necessarily intuitive because the anchor point stays put while the image moves around. Just kind of a little bit off-putting if you’re not ready for that.
The easier way to move the anchor point around is to click on the “Pan Behind Tool”.

I’m going to talk about keyboard shortcuts for the tools in a separate lesson but I’ll click on that and you can move the anchor point around. And just to help you understand what the anchor point does:
the anchor point is the point above which the layer will scale or rotate.
So if I take it up to the corner like that, for example, and going down here you press on “S” for scale. It’ll scale from that point, like so. I change the rotation by pressing the “R” key, it’ll rotate around that point.

And it doesn’t have to be in the clip. It could be outside the borders.
So you’ve got the pan behind tool still selected. You could tell it’s selected by that sort of square icon there. I can drag it outside the image like that.

When I rotate it now it’s going to rotate around that point, like so.
All right, so those are the various single key keyboard shortcuts to access single properties.
But if you want to work with multiple properties you can view more than one.
And the way to do that is to hold on the “Shift” key when you want to add something else.
So now you see rotation here. But I want to see scale too.
So I press “Shift + S” and that shows the scale and rotation.

If I want to get rid of only rotation I press “Shift + R”
It gets rid of rotation but keeps the other two properties visible.
If I want to get rid of all of them, I press R or S.
You can also work on properties in multiple layers at the same time.
I’ll select both layers by marque selecting them. And turn them both on so you can see them.
And now I’m going to press the “R” key for rotation.

And they both show up at the same time.
And since they’re both active, if I move rotation here, it rotates both of them.
If I want to add scale, I hold on “Shift + S” and add scale for both.
I can adjust the scale on both of them at the same time as well, like so.
If I want those properties to go away now, I can press either “S” or “R” and they’ll all go away.
If I press let’s say, “P” for position or “A” for anchor point, or “T” for opacity.
That’ll replace the other active properties.
So I’ll press “T” for opacity.
That gets rid of these two sets of properties and just displays opacity there. Then I can change opacity on both of those things at once.
Takeaway tips:
Did you like this post? We’ll be happy to have your feedback.


