Adding transitions in Adobe Premiere Pro

In today’s post, Jeff Sengstack, our certified Adobe expert and instructor, will show you how to add video transitions in Adobe Premiere Pro.
Note: Remember to watch the video tutorial we have prepared for you as it will make it easier to follow and understand what Jeff says.
Let’s start!
Take that “cross”
 and drag it to that edit point. That’s a video transition.
I need to go someplace because I’m getting some feedback. It’s hard to see there. So I hope this pulls off one second.
I‘ll expand the view here, so I press
and drag it to that edit point. That’s a video transition.
I need to go someplace because I’m getting some feedback. It’s hard to see there. So I hope this pulls off one second.
I‘ll expand the view here, so I press
the “plus” key a couple of times
so you can see it better.
Now, I’ll drag this again, so you can see it better.
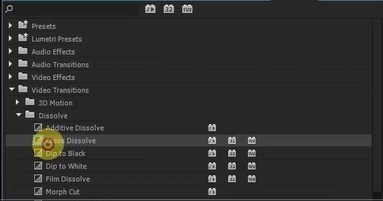
 Now it’s going to go right there and you see this thing called “cross” there.
And if I click on it, go to the Effects Control panel and then click on it again to make it “active”.
Now it’s going to go right there and you see this thing called “cross” there.
And if I click on it, go to the Effects Control panel and then click on it again to make it “active”.
 Then you can see that the duration is one second. You might not be able to see that this is one second, right there.
And “one second” is the default duration for transitions as I set it up. But I think the default transition times will be more than one second. But that’s the default.
Then you can see that the duration is one second. You might not be able to see that this is one second, right there.
And “one second” is the default duration for transitions as I set it up. But I think the default transition times will be more than one second. But that’s the default.
Here’s the video tutorial:
Join The After Effects Academy And Get Acces To This Full Lesson + Weekly Live Classes And After Effects Templates If you want to set up,that’s how you do it:
you go to Preferences again or Premier Pro Preferences.
I think it’s under General, Video Transitions usual default is 30 frames, and since we’re working with HD here, the duration time is 7 frames per second. That’s equal to one second. The audio transition is done in seconds, not frames. In still image, duration is 5 seconds. But I’ve got set at 30 frames, which is one second. But that can be changed.
 That’s how it looks. That’s a one-second cross dissolve. How easy is that, right?
After Effects Academy Member Extra
Access your ‘Video editing with Premiere Pro*’ Course in the After Effects Academy.* Jeff Sengstack will show you how edit videos in Adobe Premiere Pro. Not an AE Academy member? Click here to learn more about the After Effects Academy
If you want to change the length of it, you can do that too by just dragging on that to change the length, make it longer or shorter, like so.
Or you can just go on and you can get that old Trim Tool, just like the Trim Tool if you press the Control key in the middle of your—you got the Trim Tool there.
 You get the Trim Tool for transitions. You hover over the end of the transition. It has to be over the end of the transition because it’s a contact-sensitive cursor. So you see that little Trim Tool there, with transition built into that little icon, once you know you’re changing the length of the transition. You can do it manually by adjusting the ends of the transitions like so. Make it longer or shorter, whatever you like.
What do you do if you want a different kind of transition?
If you decide you wanted a different kind of transition, be my guest.
I’ll show you something that’s a little more obvious.
We’ll do a Page Peel. If you already have a transition there, you can replace it simply by dragging it to that place and it will replace it.
Notice that
You get the Trim Tool for transitions. You hover over the end of the transition. It has to be over the end of the transition because it’s a contact-sensitive cursor. So you see that little Trim Tool there, with transition built into that little icon, once you know you’re changing the length of the transition. You can do it manually by adjusting the ends of the transitions like so. Make it longer or shorter, whatever you like.
What do you do if you want a different kind of transition?
If you decide you wanted a different kind of transition, be my guest.
I’ll show you something that’s a little more obvious.
We’ll do a Page Peel. If you already have a transition there, you can replace it simply by dragging it to that place and it will replace it.
Notice that
You can only have one transition per location.
You can’t have more than one so it will replace whatever is there.
The Page Peel looks like that.
 And you click on it. This has more controls than the “Dissolve” had. You can see the actual sources it called by clicking on some button there.
 And you can decide over here how
 long you want the transition to be. Of course, you can decide the transition to start in a different place, start earlier over there and at the beginning of the next clip.
Feel free to leave your comments below!
Join The After Effects Academy And Get Acces To This Full Lesson + Monthly Live Classes And After Effects Templates
long you want the transition to be. Of course, you can decide the transition to start in a different place, start earlier over there and at the beginning of the next clip.
Feel free to leave your comments below!
Join The After Effects Academy And Get Acces To This Full Lesson + Monthly Live Classes And After Effects Templates